1. 前言
自己的个人网站,之前用的是cloudflare来托管域名,自带https,但是cloudflare在国内无法访问,没有什么 好的方法解决。
所以考虑用试试如何使用 Let's Encrypt,提供免费的证书:https://letsencrypt.org/
官方还提供自动化工具:certbot:https://certbot.eff.org/
2. 部署
certbot首页有个指南,但写的很简略。
2.1 安装certbot
sudo apt install certbot2.2 两种模式:webroot和standalone,要区分清楚
webroot:会在根目录生成验证文件,certbot通过访问这个路径来判断是否和服务器绑定。
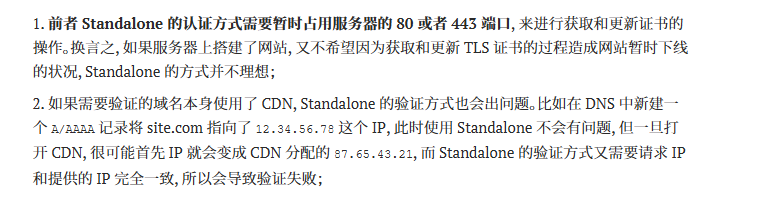
standalone :certbot直接占用80来验证服务,需要临时停止nginx /etc/letsencrypt/live/下就是证书
所以如果用standalone,更新证书都需要将nginx停止,有点麻烦,找到个说明如下:
考虑到方便性 ,我觉得用webroot
2.3 webroot方式部署
2.3.1 获取证书及配置
参考https://moxo.io/blog/2018/01/30/obtain-and-renew-tls-certs-using-letsencrypt/
先要建一个文件
sudo mkdir -p /var/www/letsencrypt/.well-known/acme-challenge在nginx配置中加上验证规则,需要重启nginx
server {
  listen 80 default_server;
  server_name default_server example.com;

  root /var/www/che;
  index index.html;

  location / {
    try_files $uri $uri/ =404;
  }

# 规则下对于 root 的命名没有规定,也可以是 /var/www/example.com 或者其它
 location ^~ /.well-known/acme-challenge/ {
   default_type "text/plain";
  root /var/www/letsencrypt;
 }
}获取证书
certbot certonly --webroot --email YOUR@EMAIL.COM -d umami.bytefuse.cn -d blog.bytefuse.cn --webroot-path /var/www/letsencrypt/成功了
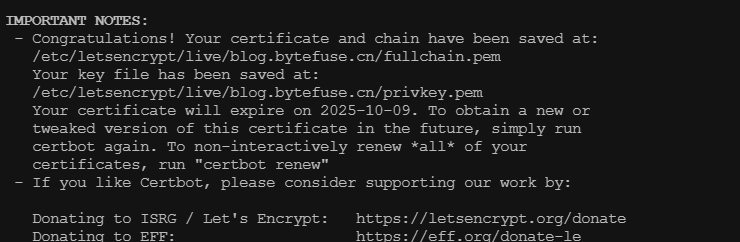
证书分别在
/etc/letsencrypt/live/blog.bytefuse.cn/fullchain.pem
/etc/letsencrypt/live/blog.bytefuse.cn/privkey.pem2.3.2 给nginx配置https证书
,首先配置让 http:// 自动跳转 https:// :
server {
  location / {
-   try_files $uri $uri/ =404;
+   return 301 https://example.com$request_uri;
}其次,添加 https://example.com 的配置:
server {
 listen 443 ssl;
 server_name example.com;

 ssl_certificate /etc/letsencrypt/live/example.com/fullchain.pem;
 ssl_certificate_key /etc/letsencrypt/live/example.com/privkey.pem;
 ssl_trusted_certificate /etc/letsencrypt/live/example.com/fullchain.pem;

 ssl_session_timeout 1d;
 ssl_session_cache shared:SSL:50m;
 ssl_session_tickets off;

 ssl_protocols TLSv1.2;
 ssl_ciphers EECDH+AESGCM:EECDH+AES;
 ssl_ecdh_curve secp384r1;
 ssl_prefer_server_ciphers on;
 ssl_stapling_verify on;

 add_header Strict-Transport-Security "max-age=15768000; includeSubdomains; preload";
 add_header X-Frame-Options DENY;
 add_header X-Content-Type-Options nosniff;

 root /var/www/example.com;
 index index.html;

 location / {
   try_files $uri $uri/ =404;
 }
}2.3.3 配置定时更新证书
Let’s Encrypt 提供的证书只有90天的有效期,我们必须在证书到期之前
更新命令如下:
如果只是想测试可以用certbot renew --autodry
certbot renew设置定时任务
crontab -e增加
15 2 * */2 * certbot renew意思是每隔 两个月的 凌晨 2:15 执行 更新操作
2.3.4 其它
- 如果你要添加一个新的域名(具体没体验过,先记录)
比如 example.com 已经有了一个认证完成的证书,这个时候 DNS 解析了一个新的子域名 subdomain.example.com,同时新开了一个 webroot /var/www/subdomain 目录指向新的子域,可以通过 --expand flag 来进行对证书的追加:
测试中关于追加子域到证书,有以下几点:
- 在 expand 的操作里,可以使用与已经认证的域名相同的 webroot 路径,即:已经认证的
example.com使用 webroot 路径是/var/www/example.com,之后想要追加的域名 subdomain.example.com 可以使用与前者相同的/var/www/example.com作为--webroot-path; - 可以不使用
--expandflag。直接在--domainsflag 之后追加新的、需要认证的子域同样 totally fine,certbot本身会提示是不是需要 expand 操作;
certbot certonly --webroot --expand -d umami.bytefuse.cn -d blog.bytefuse.cn -d www.lockpass.cn -d www.bytefuse.cn --webroot-path /var/www/letsencrypt/2.4 standalone模式
参考https://diamondfsd.com/lets-encrytp-hand-https/这个
暂时没用
记录一下,如果定时任务 ,需要关nginx
15 2 * */2 * certbot renew --pre-hook "service nginx stop" --post-hook "service nginx start"3. 完美搞定
都有锁了

